ClickUp is a productivity tool that lets you set up project workflows and tasks, and enable smooth cross-team collaboration.
RudderStack supports ClickUp as a destination where you can seamlessly send your event data.
Getting started
Before configuring ClickUp as a destination in RudderStack, verify if the source platform is supported by ClickUp by referring to the table below:
| Connection Mode | Web | Mobile | Server |
|---|---|---|---|
| Device mode | - | - | - |
| Cloud mode | Supported | Supported | Supported |
Once you have confirmed that the source platform supports sending events to ClickUp, follow these steps:
- From your RudderStack dashboard, add a source. Then, from the list of destinations, select ClickUp.
- Assign a name to the destination and click Continue.
Connection settings
To successfully configure ClickUp as a destination, you will need to configure the following settings:
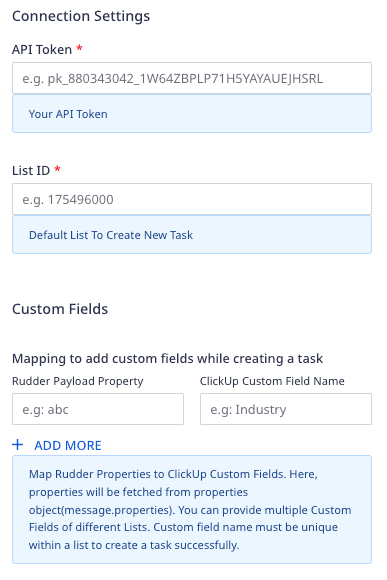
- API Token: Enter your ClickUp API token.
- List ID: Enter your ClickUp list ID.
- Mapping to add custom fields while creating a task: Use this setting to map a specific RudderStack event property to a ClickUp Custom Field.
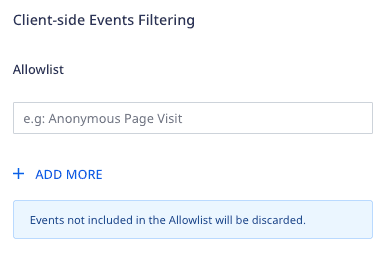
- Client-side Events Filtering: This setting lets you specify which events should be allowed to flow through to ClickUp.
Track
You can use the track calls to create a task in ClickUp.
A sample track call is shown below:
rudderanalytics.track( "Product Viewed", { "taskName": "Whole Foods Market", "tags": ["plan", "proposal", "marketing"], "timeEstimate": 10800000, "status": "Proposal", "dueDate": "2023-02-25T13:39:21.032Z", "startDate": "2022-01-20T13:39:21.032Z", "industryKey": "Retail", "paymentStatus": "Reject", "label": ["Transformer", "QA", "Testing"], "location": { "lat": -28.016667, "lng": 124, "formattedAddress": "New Orleans, Louisiana", }, "phone": "+12025550146", }, { "externalId": [{ "type": "clickUpListId", "id": "199314977", }, { "type": "clickUpAssigneeId", "id": 61205104, }, { "type": "clickUpAssigneeId", "id": 61229682, }, ], });RudderStack uses the ClickUp task endpoint to create a task within a list.
To successfully create a task, you need to specify the List ID in the dashboard settings. You can also pass the list ID through externalId, as seen in the above sample snippet.
externalId over the list ID specified in the dashboard.Adding assignees to a task
While creating a task, you can assign it to a Team(Workspace) member by specifying a userId. You can also pass multiple userId in an externalId array, as shown:
{ "context": { "externalId": [{ "type": "clickUpAssigneeId", "id": 1232 }, { "type": "clickUpAssigneeId", "id": 88765 } ] }}Adding custom fields
You can pass the custom fields to ClickUp by specifying the mapping in the Mapping to add custom fields while creating a task dashboard setting, as shown:
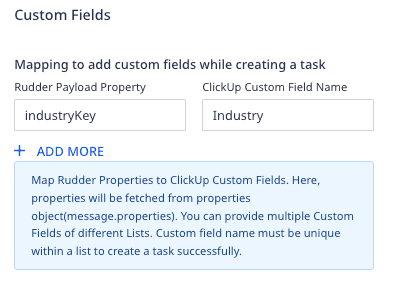
You can specify the ClickUp Custom Field Name corresponding to the custom field you created in the ClickUp dashboard and the RudderStack Payload Property corresponding to the event property present in the payload.
RudderStack uses the custom field name to retrieve the id using the field endpoint.
Supported custom fields
RudderStack supports specifying the following ClickUp custom fields in the dashboard settings:
| Custom Field | Notes |
|---|---|
| URL | Must be in a valid URL format. |
| Must be in a valid email format. | |
| Phone | Must be a valid phone number with a country code, for example, +1 123 456 7890. |
| Date | Must be a valid date in a datetime format, for example, 2022-02-25T13:39:21.032Z. |
| Text | Must be a string. |
| Checkbox | Must be in a Boolean format. |
| Number | - |
| Currency | Must be a number. |
| Emoji (integer) | Used for rating. The value must be in a range defined in the ClickUp dashboard. |
| Location | Latitude/longitude and the formatted address must be passed as the Google Geocoding API. |
| Dropdown | RudderStack uses the dropdown option name to find the UUID using the field endpoint. |
| Label | RudderStack will use the label name to find the UUID using the field endpoint. |
RudderStack currently does not support specifying the following custom fields:
- Tasks
- Users
- Automatic Progress
- Manual Progress
Note that when sending the custom fields to ClickUp:
- You can provide multiple custom fields of different ClickUp lists in the dashboard.
- To successfully create a task, you need to provide a unique custom field name within a list in the custom field mapping.
Supported mapping
The following table lists the mappings between the optional RudderStack properties and the ClickUp properties:
| RudderStack property | ClickUp property | Data type |
|---|---|---|
context.externalId.id when context.externalId.type = clickUpListId | list_id | String |
properties.taskName / message.event | name | String |
properties.description | description | String |
context.externalId.id when context.externalId.type = clickUpAssigneeId | assignees | Array |
properties.tags | tags | Array |
properties.priority | priority | Integer |
properties.timeEstimate | time_estimate | Integer (in ms) |
properties.status | status | String |
properties.dueDate | due_date | Datetime |
properties.includeDueDateTime | due_date_time | Boolean |
properties.startDate | start_date | Datetime |
properties.includeStartDateTime | start_date_time | Boolean |
properties.notifyAll | notify_all | Boolean |
properties (Only fields mentioned in the dashboard mapping) | custom_fields | Array |
Rate limits
Note that the ClickUp enforces rate limits per OAuth and personal token. This rate limit depends on your ClickUp plan and is summarized in the following table:
| ClickUp plan | Requests allowed per minute |
|---|---|
| Free Forever, Unlimited, Business | 100 |
| Business Plus | 1000 |
| Enterprise | 10000 |
FAQ
Where can I find the ClickUp API Token?
To obtain your ClickUp API token, follow these steps:
- Log into your ClickUp dashboard.
- From the left sidebar, click the Settings button at the bottom and go to MY APPS > Apps.
- You can find the API token listed here, as shown:

Where can I find the ClickUp List ID?
To get your ClickUp list ID, follow these steps:
- In your ClickUp dashboard, click the ellipsis button next to your list and select Copy Link.
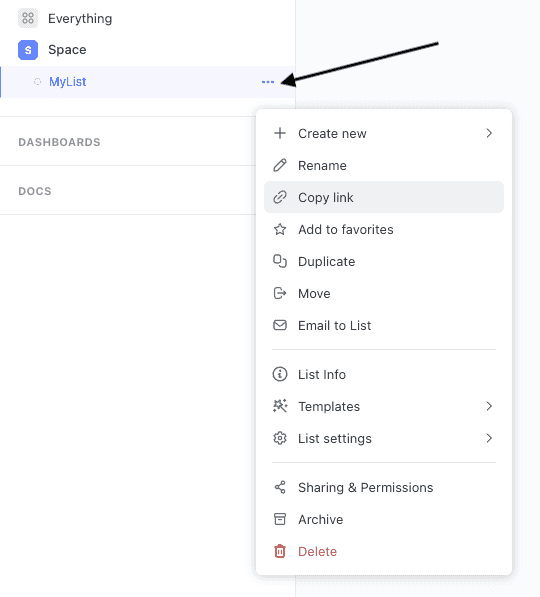
- Paste the URL in your browser's URL bar. You can find the list ID in the URL as highlighted in the below image:

How can I create custom fields in ClickUp?
To create custom fields in your ClickUp list, follow these steps:
- In your ClickUp dashboard, click the ellipsis button next to your list and go to List settings > Custom Fields.
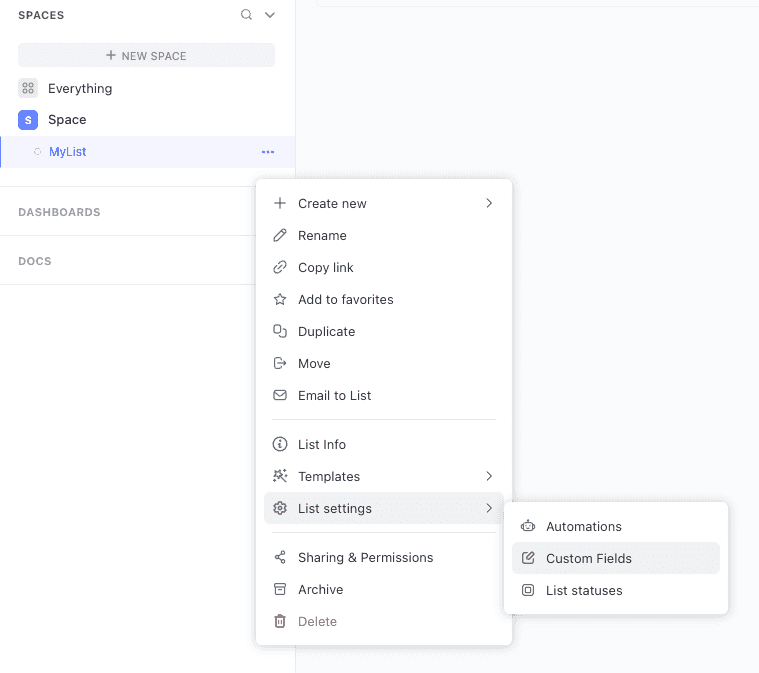
- Choose the type of custom field you want to create and configure the Field Name and Field Type accordingly.

- Finally, click Create.
Contact us
For more information on the topics covered on this page, email us or start a conversation in our Slack community.